Thursday, July 28, 2011

Huntin' Stuff

For part of vacation I visited my parents in Springfield, MO. One day my mom and I hit the "antique" stores. I put antique in quotes because although that's what they claim to be, they tend to be more flea market, but you can truly find some awesome treasures...and some crazy, weird stuff too.

Springfield has a ton of these stores and each one has hundreds of booths/vendors. I think that's why the prices tend to be reasonable. Here are my tips so you don't blow your budget on stuff that you don't need no matter how cool.
1. Think about what you want before you go. Plan to look for certain items.
2. Decide how much something is worth to you before you see it. This day I wasn't going to spend over $20 on any single item. You may want to just plan a general spending limit.
3. How will you use it or where exactly will you put it? If you can't answer that, no matter how much it hurts, it's best to save your pennies for something better suited to you and your needs.
4. Be flexible. Maybe you were looking for glass, but you found and fell in love with lanterns. If you know you love it and how you will use it, jump on it. It may be the only time you come across it.


I really had to be flexible because I didn't find much from my original list, but I'll show you what I got in a bit, first I'll show some stuff I passed on because that's fun too.


This fan was cool, and at $12, in my rules for the day, but I just couldn't make up my mind. 

I knew which room to put it in, but not where. Slight pangs of regret, but I'm coming to terms.


Seriously, a shelf of glass casserole dish lids with no casserole dishes. Who buys that?
(Watch. Now that I was snarky somebody is going to come up with something wicked cool to do with those. So it goes.)


This milk delivery box was cool, but I really had no use and it was $24, I think.


And this is why these stores are just plain fun and mildly crazy:
Deodorant? Right there next to Raggedy Andy. Now who is going to an antique store for deodorant?!


I should have lugged this bad boy home for Mateo's office. That would have been great.  ;) And, yes, it's full size.


My oldest loves trains. It started with Thomas and now we are building a model railroad (just giving you a heads up if you have Thomas lovers out there).

I found the motherload. Old tickets.


A conductor's case with all the tools.


Conductor's hats. But I had to walk away. The prices were $100/each ticket, $1200 for the conductor's case and $300 for a hat. Firm.


Alas, I couldn't afford or bring home this church pew:


Some lanterns that were slightly above my set budget, and at the end of the day so I'd already spent enough:


Same for this scale.


Really, it is so much fun to poke around and see what you can find, even if you leave it behind.


So what did I come home with? A modest loot. I snagged some mason jars with glass lids, two of which were blue glass for $3.50 a piece.


This is a juice bottle from Kraft. 

Probably something you had to send for. It has measurements for mixing the juice concentrate with water. I just liked the shape and color. I'm a sucker for jars, bottles, and pitchers.


I have wanted a wire basket. This is to transport whipped cream. I have an idea on how I'm going to use this, you'll just have to wait and see. :)


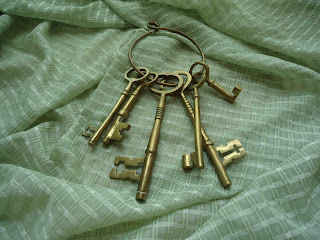
And brass skeleton keys. This one was not what I expected, but I was drawn to them and knew exactly what I wanted to do, so at $6 I grabbed them.

At one of the store I cracked up at this most awesome sign:


This post may be linked at the following parties (for their Blog Buttons see my Link Love page): (M) Mad Skills , C.R.A.F.T., Amaze Me Monday, Sumo's Sweet Stuff, Singing Three BirdsMasterpiece Mondays, Making the World Cuter, Sarahndipities, A Little Birdie Told Me (T) Stories of A to Z, The Blackberry Vine, How To's Day , Type A, Amaze Me August, Ten Buck Tuesday, Handmade Tuesdays, Anything Related, Tuesday's Treasures, Strictly Homemade, Show Me What Ya Got, Time to Shine, Show Off Your Crafty Side (W) Wow Me Workshop Wednesday, Whassup Wednesday, Blue Cricket Design, Look What I Made, What I Whipped Up, The Trendy Treehouse, Wicked Awesome Wednesday , Good Life Wednesday, Inspiring Creativity, Sweet Peas & Bumblebees (TH) Beyond the Picket Fence  Creative Juice, Somewhat Simple, Thrifty 101 , Smilemonsters , Everything But the Kitchen Sink, Shabby Chic Cottage, Thrifty Thursdays, House of Hepworth's, Thrilling Thursday, (F) Fingerprints on the Fridge, Furniture Feature Friday, SevenThirtyThree , Lovely Crafty Weekend , Simply Designing, Creative Corner, Tickled Pink 504 Main, Inspiration Friday at The Picket Fence, Friday Flair, Remodelaholic, For the Kids Fridays, Frugal Friday, Craft Goodies, I'm Lovin' It, Flaunt It Fridays , Thirty Handmade Days (Sat) Tatertots and Jello , Anything Goes (Sun) Creative Blog & Hop, Sundae Scoop, Under the Table and Dreaming

Wednesday, July 27, 2011

Trash to Treasure

 A long time ago, I mentioned that I had snagged a couple of chairs from the side of the road. There was nothing wrong with them but a bit of ugly.


The mission was to paint and change the fabric. So off came the cushion. And the chair was sanded. (I could have sworn I took pictures of this part, but I can't find them.)

I used Rustoleum's Heirloom White spray paint. Each chair took a can and a half. I'm not getting perked to say this, but I think the claim that a can of Rustoleum covers twice as much as other brands is true. I does seem to cover more than others, but that said, you have to go with what you like.


After painting, I decided to distress them a bit. I just hit them in the places that might sustain wear with my hand sander, Hermes. Yes, I named him. Doesn't everyone name their tools?


And remember how I waxed poetic about finishing wax in this post? (Pun intended, of course!) I rubbed on a coat of the wax paste, let it dry about fifteen minutes, and then buffed. I love how wax finishes pieces!


On to the cushion. I needed my new fabric, scissors, and a staple gun. Staple guns are awesome and useful for so many things. Seriously, go get one if you don't have one.


I laid my cushion on my fabric and cut around to size with a few extra inches all around.


Then I stapled one staple in the center of each side. Pull taut, but don't over do it. If you have a pattern like my toile you risk making the pattern skewed.


Then I worked along the front and stapled across the whole side, then back and then each side. For the corners, staple in very close to the corner. Fold and tuck the excess fabric (not unlike wrapping a present), 

pull tight and staple like crazy.


Once secure, trim excess fabric. And repeat with the other corners. 


You will have something like this:

Now it's time to re-screw the cushion to the chair.


I really love the toile with the distressed white chair.


And the distressing worked, but I think it was more dramatic on the black desk.

I like the desk and I like the chair, but the jury is still out on whether or not I like them together. I never really planned on keeping the chairs, I just didn't think they should be trashed. I may still just sell them.

This post may be linked at the following parties (for their Blog Buttons see my Link Love page): (M) Mad Skills , C.R.A.F.T., Amaze Me Monday, Sumo's Sweet Stuff, Singing Three BirdsMasterpiece Mondays, Making the World Cuter, Sarahndipities, A Little Birdie Told Me (T) Stories of A to Z, The Blackberry Vine, How To's Day , Type A, Amaze Me August, Ten Buck Tuesday, Handmade Tuesdays, Anything Related, Tuesday's Treasures, Strictly Homemade, Show Me What Ya Got, Time to Shine, Show Off Your Crafty Side (W) Wow Me Workshop Wednesday, Whassup Wednesday, Blue Cricket Design, Look What I Made, What I Whipped Up, The Trendy Treehouse, Wicked Awesome Wednesday , Good Life Wednesday, Inspiring Creativity, Sweet Peas & Bumblebees (TH) Beyond the Picket Fence  Creative Juice, Somewhat Simple, Thrifty 101 , Smilemonsters , Everything But the Kitchen Sink, Shabby Chic Cottage, Thrifty Thursdays, House of Hepworth's, Thrilling Thursday, (F) Fingerprints on the Fridge, Furniture Feature Friday, SevenThirtyThree , Lovely Crafty Weekend , Simply Designing, Creative Corner, Tickled Pink 504 Main, Inspiration Friday at The Picket Fence, Friday Flair, Remodelaholic, For the Kids Fridays, Frugal Friday, Craft Goodies, I'm Lovin' It, Flaunt It Fridays , Thirty Handmade Days (Sat) Tatertots and Jello , Anything Goes (Sun) Creative Blog & Hop, Sundae Scoop, Under the Table and Dreaming

Tuesday, July 26, 2011

Art Adventure: Veggie Prints

I was on vacation and came back to some veggies that were no longer edible. I also needed a simple art project. It went together too perfectly.

Veggie Prints
Supplies:
  • any vegetables, sliced or cut (potatoes can be cut into any shape)
  • tempera paint
  • paper
  • waxed paper

I just took an assortment of veggies that were on their last legs (but you can use fresh if you want to), sliced them and blotted them on a paper towel if they were too watery.
I squeezed the paint onto waxed paper, but you can use a piece of cardboard, a paper plate, whatever you have. I smeared the paint into a thin layer so the prints would be less "gobby." (Is that a word?)


Lay everything out and give your child a piece of paper. 
Dip a veggie into the paint.

Then press onto your paper.

Lift up to reveal the print. And then keep going.


My little guy is three and he really loved this.


He did one by himself and then we did one together.


This post may be linked at the following parties (for their Blog Buttons see my Link Love page): (M) Mad Skills , C.R.A.F.T., Amaze Me Monday, Sumo's Sweet Stuff, Singing Three BirdsMasterpiece Mondays, Making the World Cuter, Sarahndipities, A Little Birdie Told Me (T) Stories of A to Z, The Blackberry Vine, How To's Day , Type A, Amaze Me August, Ten Buck Tuesday, Handmade Tuesdays, Anything Related, Tuesday's Treasures, Strictly Homemade, Show Me What Ya Got, Time to Shine, Show Off Your Crafty Side (W) Wow Me Workshop Wednesday, Whassup Wednesday, Blue Cricket Design, Look What I Made, What I Whipped Up, The Trendy Treehouse, Wicked Awesome Wednesday , Good Life Wednesday, Inspiring Creativity, Sweet Peas & Bumblebees (TH) Beyond the Picket Fence  Creative Juice, Somewhat Simple, Thrifty 101 , Smilemonsters , Everything But the Kitchen Sink, Shabby Chic Cottage, Thrifty Thursdays, House of Hepworth's, Thrilling Thursday, (F) Fingerprints on the Fridge, Furniture Feature Friday, SevenThirtyThree , Lovely Crafty Weekend , Simply Designing, Creative Corner, Tickled Pink 504 Main, Inspiration Friday at The Picket Fence, Friday Flair, Remodelaholic, For the Kids Fridays, Frugal Friday, Craft Goodies, I'm Lovin' It, Flaunt It Fridays , Thirty Handmade Days (Sat) Tatertots and Jello , Anything Goes (Sun) Creative Blog & Hop, Sundae Scoop, Under the Table and Dreaming

Monday, July 25, 2011

It's LunchPossible!

Awhile back I shared this post at Jam Hands, a favorite food blog of mine. I thought I'd share it here today.

Out in blogland, I wish I could remember where, I saw the idea of making a menu for the kids to deal with the summer lunches. I thought this was a great idea. But I wanted to make the lunches "ready-to-go" so I created my own, much tastier and healthier, lunchables.
I made up my menu:

This is posted to the fridge so they can stand there and ponder it as long as they want, and I don't have to stand there and repeat their choices until they decide. I can go about my business.

So, what are their choices?

Pizza: homemade flatbreads, mozzarella, pepperoni, and pizza sauce with carrot sticks and jello. Just use your favorite recipes or brands.

For the Jello cups, it is a huge money saver to make your own. I bought 4 oz. mason jars. With one package of Jello, I was able to fill eight jars.


If the boys pick a lunch with a Jello cup, they can grab one and eat it right out of the jar. So easy.

Meat, Cheese and Crackers:

Um, it's what it sounds like. But if you do it yourself, you control the quality. And I include fresh fruit.

Boiled Egg Box:

My youngest doesn't eat much meat, so this box is about meatless protein. A boiled egg, celery with peanut butter, and a Jello cup.

Butter Noodles:

Butter noodles, peas, cheese and applesauce


After boiling the noodles and draining I add butter or margarine and a dash of garlic salt. Stir it up and add it to the box.
Also, add peas, sliced cheese and an applesauce cup. (Again, money saver, buy a large jar of applesauce and pour into small mason jars. Huge savings, little work.)

When you serve this box, take out the applesauce and cheese and add a tiny bit of water. Loosely cover with the lid and pop in the microwave to reheat. The tiny bit of water will steam things so the pasta isn't dry.

I will just make up several boxes on the weekends to stock up the fridge for the upcoming week.


I will probably have some other options on occasion too. It's not that I mind cooking; actually, I love to cook. It's that I hate the daily drama of deciding what to have for lunch. Now there is no guess work. 

After doing all this, I realized that these would work great for packed lunches for school too. I may have to add some ideas for variety throughout the year.

Featured On:

Photobucket


Back To School Blog Hop with Rook No. 17Photobucket


Thursday, July 21, 2011

Craigslist Desk

I've been trying to have success with Craigslist forever now. I finally had luck and scored this desk:

for thirty dollars. It needed refinishing, but it was a great find.
 
After a sanding and a little bit of patching, I painted the desk flat black. I used Valspar Latex Enamel which you get at Lowe's near the spray paints.

Once it was dry I got out the sander and distressed it. I don't often do this, but I was really pleased with the results.


Then I tried finishing wax for the first time. After talking to a man that restores furniture, I really wanted to try Briwax, but there isn't a supplier here and I was too impatient, so I just tried Miniwax.

I LOVE it! The finish is protected and so much richer now. I seriously want to just go around and wax everything now. :)

It was super easy. Wipe it on, let it dry for fifteen minutes and buff.

In the down time, waiting for the paint to dry, I worked on the hardware.

The patina had a certain charm, but I really wanted silver accents. So, out came the silver leaf Rub n' Buff.

It takes just a little bit. Rub it on, then buff it a bit. Easy peasy.


I am so happy with this piece.


This post may be linked at the following parties (for their Blog Buttons see my Link Love page): (M) Mad Skills , C.R.A.F.T., Amaze Me Monday, Sumo's Sweet Stuff, Singing Three BirdsMasterpiece Mondays, Making the World Cuter, Sarahndipities, A Little Birdie Told Me (T) Stories of A to Z, The Blackberry Vine, How To's Day , Type A, Amaze Me August, Ten Buck Tuesday, Handmade Tuesdays, Anything Related, Tuesday's Treasures, Strictly Homemade, Show Me What Ya Got, Time to Shine, Show Off Your Crafty Side (W) Wow Me Workshop Wednesday, Whassup Wednesday, Blue Cricket Design, Look What I Made, What I Whipped Up, The Trendy Treehouse, Wicked Awesome Wednesday , Good Life Wednesday, Inspiring Creativity, Sweet Peas & Bumblebees (TH) Beyond the Picket Fence  Creative Juice, Somewhat Simple, Thrifty 101 , Smilemonsters , Everything But the Kitchen Sink, Shabby Chic Cottage, Thrifty Thursdays, House of Hepworth's, Thrilling Thursday, (F) Fingerprints on the Fridge, Furniture Feature Friday, SevenThirtyThree , Lovely Crafty Weekend , Simply Designing, Creative Corner, Tickled Pink 504 Main, Inspiration Friday at The Picket Fence, Friday Flair, Remodelaholic, For the Kids Fridays, Frugal Friday, Craft Goodies, I'm Lovin' It, Flaunt It Fridays (Sat) Funky Junk InteriorsTatertots and Jello , Anything Goes (Sun) Creative Blog & Hop, Sundae Scoop