Tuesday, March 26, 2013

Marbling Eggs

I love making Easter eggs. I also like trying out new techniques.

This pin has made the Pinterest rounds, but I can't find the source:


If anyone knows where it originally came from, please share.

With no instructions, I decided to experiment to see how exactly to accomplish this wonder.

I tried paint (figuring less risk of dying my hands) and I am disappointed to say it didn't work at all.

So here's what worked: I squirted about a palmful-worth (perhaps more) of shaving cream onto a piece of aluminum foil. Then I dotted it with food coloring.

I used a toothpick to swirl the color through the shaving cream without fully mixing it.

Then, we rolled the eggs in the mixture, just once to coat all sides.

To give the color a chance to really stain the eggshell, we left them sitting for about five minutes.

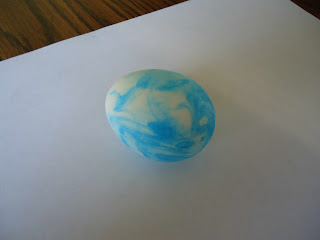
Then with a paper towel, I just wiped it all off and was left with a pretty marbled Easter egg.

Given that eggs are semi-porous I wondered if the shaving cream might leech through, so I made Mateo try one. :) He said it was fine. Just tasted like a regular boiled egg.

Then, because I was just experimenting and didn't have a whole bunch of eggs ready to color, I decided I need to somehow do something with my left over shaving cream/color. Didn't want to waste it.

So, I laid a piece of white paper on the shaving cream, lifted it up, laid it down again, and so on until I had covered the whole paper.

Then I used a paper towel and just wiped the saving cream off. No fancy technique, just wiped.

I was left with a very pretty marbled paper.

This way of marble paper was so much easier than regular marbling. It's a bit messy, but so is regular marbling. I highly recommend this method for young kids.

Once the paper is dry, the possibilities are endless: make cards, use for origami, paint a picture, write a poem on it...              

Saturday, March 23, 2013

Crowning Glory

Peeps, I try never to speak ill of others on the interwebs, so I will not mention names. However, there is an epidemic of silliness going on that needs some addressing.

Crown molding.
Don't go to DIY bloggers for instructions! Go to the professionals!

Recently we added crown molding to our living room. Mateo looked up "This Old House" and followed Tom Silva's instructions. Because, you know, he does this for a living.

Hi, Tom!

Here's the quick video that simply explains the cuts.
What we discovered was that you don't need to go buy a special tool kit. For shame, home improvement stores who rip unsuspecting people off with these (and for shame, bloggers promoting them.)

A miter saw helps, a miter box and hand saw will do.
A coping saw.
A hammer.
That's all you need.

What most shocked us was that for inside corners, you don't cut angles on both pieces of molding, just one. Oh, my goodness did that make things so much easier!

During install, I couldn't always be there to hold the long boards, and nailing without a nail gun takes a bit more time and effort. Mateo's ingenious solution was this bitty block:

He nailed it in place just under the molding like a little shelf. It acted as an extra hand while he was working. Once nailed in, he popped it off. Little spackle to fill the holes and tiny bit of touch of paint and no one's the wiser.

We painted our molding before installing. After install we filled the nail holes and then caulked. 

Pre-caulk, you can see the dark shadowy gap in the center.
 
This is key to making it look completely seamless especially in older houses with less than straight walls
Post-caulk, nice and smooth.

Therefore, painted molding is easier than stained molding. And, of course, there will be some touch up painting.

If you plan to tackle this, I say go forth and crown things. It's not so difficult. But check out "This Old House," since, you know, they were teaching us to be DIYers before it was cool. :)