Wednesday, June 20, 2012

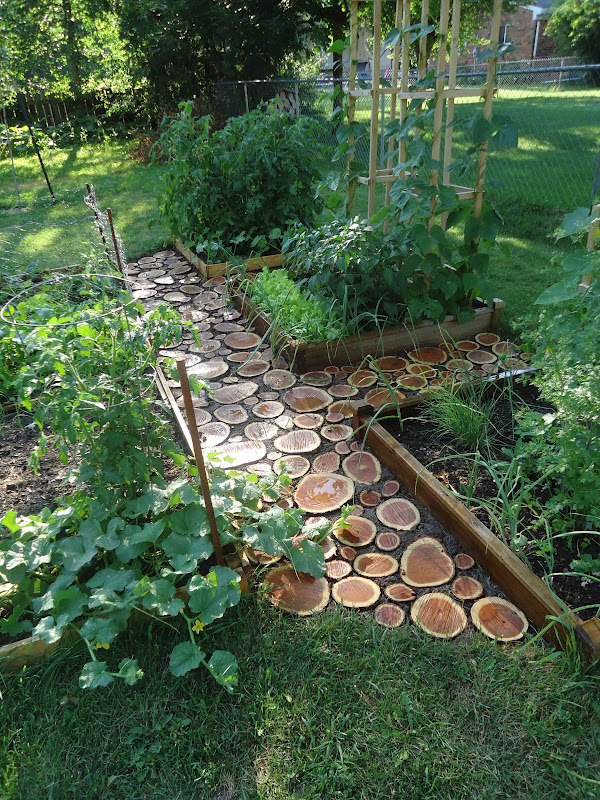
Garden Path Redux

[UPDATE: click here for the final garden path update.]
 
Sooo. Y'all seem to love the Garden Path. 


All time most viewed, and most featured. (Even contacted about a magazine feature, but alas, I live in the wrong region.)

Also, the source of a thousand and one questions. So, here it is: the complete, honest update.

I knew the wood would weather. Usually weathered wood is pretty. But before spring had completely sprung, I knew I was no longer in love with my path.

So sad.

A LOT of people asked about using polyurathane so that the disks would not rot. Well, they did not rot. If this was a more shaded and protected area, they might have even weathered nicely. But there were absolutely no rotting issues. There was just an ugly issue.

I decided to fix it, we would cut new disks and coat them, but I wanted something that was environmentally sound. The EPA recommended Shellac, and being natural, it seemed like a good idea. I've shellacked things before, so I knew the product.

I just brushed one side, waited an hour, flipped it over and painted that side. Time consuming, but easy.

I only did one coat, so I guess time will tell as to any regrets on that choice.

We also made these a bit thicker. The last ones were about 1-3 inches. I had talked last time about how they sometimes pop up when you walk on them, and some of the disks broke during the year, so we figured thicker might help. These new ones average 4-5 inches.


One major headache the first time was our darn hard clay. It was hard to scratch out the space to set the disks and then pack them in. I loved the rich dark soil color against the wood, but it did not hold them as it should. Many people wondered about using sand.

So we tried it. First we tilled the soil to make it as loose as possible and then we added a bit of sand and worked that in.

It was much easier to get the disks set in this time. I still don't love the color of the sand, but we planted ground cover, so hopefully that won't be much noticed soon.


Of course, last time the ground cover didn't grow in, so who knows? Maybe I'll just have to grow to love sand.

Another question I was asked A LOT was whether or not the wood was slippery when wet. Um, no. It's not like the disks are a smooth surface of wood. They are broken up with gaps in between and also not sanded or anything. They are smooth enough to walk barefoot on them, but no, they have never been slippery. Of course, the entire set up does not induce one to walk quickly in the first place. And, no, they are not slippery now that they have been sealed either.

I loved how the first path looked, so when I went and checked it last spring I was heartbroken at how it appeared. I was determined to fix it, and so we did. I am in love with it once again. I am pleased to say that the disks are not popping up at all. They are very solidly set in the sand, even after a pretty decent rain.

And, as always, I'll keep you posted about how this version weathers.

And, hey, firewood for the fire pit, so that's not so bad.

This post may be linked at the following parties (for their Blog Buttons see my Link Love page): (M) C.R.A.F.T., Amaze Me Monday, Sumo's Sweet Stuff,  (T) A Little Birdie Told Me  Stories of A to Z, The Blackberry Vine, How To's Day , Type A, Amaze Me August, , Show Me What Ya Got,  (W) Wow Me,  Blue Cricket Design, What I Whipped Up, Wicked Awesome Wednesday, Sweet Peas & Bumblebees (TH) The ArtsyGirl Connection,  Creative Juice, Thrifty 101 , Smilemonsters , Everything But the Kitchen Sink, Shabby Chic Cottage, Thrifty Thursdays, House of Hepworth's,  (F) Fingerprints on the Fridge, Furniture Feature Friday,  Lovely Crafty Weekend , Remodelaholic, For the Kids Fridays, , Craft Goodies, (Sat) Tatertots and Jello , Anything Goes , Funky Junk Interiors (Sun) Creative Blog & Hop, Sundae Scoop, Under the Table and Dreaming

Wednesday, June 13, 2012

Front Yard Change Up

We knew we wanted to redo our front planting beds this summer, so when our friends were over I asked if we could borrow their truck some time. The truck arrived in our driveway the next day. So, we had to get our butts in gear. :)

When we moved in, there were rocks lining the beds. I liked the rocks, but I didn't like the shape of the beds or how the rocks were lined up like little soldiers.

So first we pulled up the rocks and moved them around until we settled on a tumbled rock wall looking motif.

We were going to make different heights and more curves. The area behind the "walls" was filled in with dirt, but before that we had to dig out some of the grass. And by we, I mean...

Yes, Matt did the digging.
 And the shoveling, and the planting, and the mulching. Where the heck was I?!

Actually, I kind of forget. I think I had stuff to do at school and with the kids, so Matt did all the heavy labor. I just popped in to say where stuff should go and how it should look.

Anyways. The changes in elevation are not huge, and in the pictures it's hard to even tell for sure.

We planted begonias where the rocks and ground sloped down. Those we bought from a fundraiser for Chi's preschool and that was $15. But I'm not really counting that since it was for a good cause. I mean other than my yard.


We bought two hostas and two Autumn Joy sedum from a garden club plant sale for another $15.
Those little guys in front of the rocks are sedum.
The new hostas are on the left and the hostas on the right were just divided to fill out the space.

And finally, a Japanese barberry for $4.

That's the little one in the middle. It has burgundy leaves.

The rest of our plants were pulled from places where they weren't thriving or were able to be divided. 
The azaleas were on the side of the house and they were dying, but they like better here.

So pre-mulch we only spent $34 if you count the begonias. Which we aren't.


We went with black mulch. I love how it makes all the colors pop. Plus it reminds me of the way rich Iowa soil looks. I miss that soil!


We buy mulch in bulk at a local landscape supplier. Hence the need for a truck. You were wondering, weren't you?

We also mulched in our backyard, so we needed 3 cubic yards. That amounted to $100. It would have cost about $50 more to go buy the bagged stuff at a home improvement store. (That's 30% off.) I know you need access to a truck, but it's worth it if you have access to one.


The weigelas in the center look a bit sad. They were transplanted from our neighbor's yard and they did not care much for the move. But they are slowly starting to come back, so we are holding out for awhile longer on those. Keep your fingers crossed!
 

So...That's the yard. Better, right? 

This post may be linked at the following parties (for their Blog Buttons see my Link Love page): (M) C.R.A.F.T., Amaze Me Monday, Sumo's Sweet Stuff,  (T) A Little Birdie Told Me  Stories of A to Z, The Blackberry Vine, How To's Day , Type A, Amaze Me August, , Show Me What Ya Got,  (W) Wow Me,  Blue Cricket Design, What I Whipped Up, Wicked Awesome Wednesday, Sweet Peas & Bumblebees (TH) The ArtsyGirl Connection,  Creative Juice, Thrifty 101 , Smilemonsters , Everything But the Kitchen Sink, Shabby Chic Cottage, Thrifty Thursdays, House of Hepworth's,  (F) Fingerprints on the Fridge, Furniture Feature Friday,  Lovely Crafty Weekend , Remodelaholic, For the Kids Fridays, , Craft Goodies, (Sat) Tatertots and Jello , Anything Goes , Funky Junk Interiors (Sun) Creative Blog & Hop, Sundae Scoop, Under the Table and Dreaming
  

Monday, June 11, 2012

Da Bomb Cake

So, I actually kind of forgot about the cake tutorial, so sorry if any of you have been waiting for it!
This was the cake for the Spy Birthday Party.

I have this bread baker's bowl. It was a gift and it's from the Ozarks, so I don't know how common they are. 


I also have a cake batter bowl from Pampered Chef that can go in the oven, so I know y'all are smart and can figure out something similar to use.

I fixed up my chocolate cake mix (yes, I used a box mix). Oh, if you want to flour your bowl but not have it white, save a little mix to the side when you stir it up. Grease the bowl, and use the saved mix to flour it. No white when it's done.

Unless you have two that are the same size, it will take awhile to bake because you have to bake half of it first and then the other half. Also, it took forever to bake. Don't panic, just give it time.

Once you have have your two halves baked, it's assembly time. My bread bowl made the halves mostly round, but they had a small flat disc on the bottoms. This is will be both good and bad. They also puffed a bit on the wide sides as cakes do. 


I started by trimming this part off with a serrated knife so that they were flat surfaces. Save this cake.


I took a small smear of my chocolate frosting (from a jar. This surprises you?) and placed that on the center of my cake stand. Then I put my first half down. The frosting will hold it in place.


Frost the center like a regular cake, and then invert the top half onto the cake so that it makes a round ball shape. However, you still have that flat bit on the top now. It was a helpful place for the cake to stand on the bottom, but here on the top it just throws off the look.

But, your scraps should be somewhat rounded having been the puffed up part, so carefully cut some of the scrap and frost and place it on the cake until you are rounded.

Now you need the little "spout" bit that the wick comes out of. I just cut a circle out the the scraps and placed that on top of the cake, frosting in place.


Now, just frost the whole thing.


So, it was frosted, but not smooth. I filled a small bowl with hot water and I dipped my knife in the water, then without much pressure, smoothed over my frosting.


Some frosting came off on my knife, but I just scraped it off on the bowl when I dipped again. Basically this will melt the frosting just a bit which helps you smooth it and turns it a little glossy.


The last touch was a curly candle so it looked like a wick. I found them in the baker's aisle at the grocery store.


Just remember when you slice it, that it is tall instead of wide! You will want to cut narrow slices. 

This post may be linked at the following parties (for their Blog Buttons see my Link Love page): (M) C.R.A.F.T., Amaze Me Monday, Sumo's Sweet Stuff,  (T) A Little Birdie Told Me  Stories of A to Z, The Blackberry Vine, How To's Day , Type A, Amaze Me August, , Show Me What Ya Got,  (W) Wow Me,  Blue Cricket Design, What I Whipped Up, Wicked Awesome Wednesday, Sweet Peas & Bumblebees (TH) The ArtsyGirl Connection,  Creative Juice, Thrifty 101 , Smilemonsters , Everything But the Kitchen Sink, Shabby Chic Cottage, Thrifty Thursdays, House of Hepworth's,  (F) Fingerprints on the Fridge, Furniture Feature Friday,  Lovely Crafty Weekend , Remodelaholic, For the Kids Fridays, , Craft Goodies, (Sat) Tatertots and Jello , Anything Goes , Funky Junk Interiors (Sun) Creative Blog & Hop, Sundae Scoop, Under the Table and Dreaming

Saturday, June 9, 2012

Baseboards

New baseboards!!!


I'm just a wee bit excited. Can you tell?


We still have to touch up and add shoe molding, but I no longer have the ugly ripped up bottom of the wall look in my living room.
Woo-to-the-hoo.

This totally wasn't worth a whole post, but I couldn't help it. :)

Tuesday, June 5, 2012

Boxed Up

I have a bit of an unusual piece of art in my living room. It's a side of a cardboard box. The only people who have ever commented on it are people who just outright ask, "Why do you have a framed box on your wall?"
Sorry it's so darn reflective...I hope you can see it well enough.

Well, you all know we've moved around a bit. When Matt finished grad school and we were moving...again...but this time for a job, Gabe was five years old and he was going to "help" me pack and label boxes.

One of the boxes was Keurig (the coffee pot maker) and their logo has a little coffee mug.

Gabe knew how much his dad liked coffee, so he decided to draw Matt holding that coffee mug from the logo. It was so clever and ridiculously cute! At the time I snapped a picture, but the box was in great shape when we finally moved in, so I saved it.


It was just put into a frame with no real thought to it. Spare frame + thing that needed protecting = done.

But the box blended in with the background. So I finally just took care of it. It was so simple, I don't know why I waited so long.


The background was just the frame backing. I took it out and grabbed some spray paint. I had about a quarter can of Oil Rubbed Bronze leftover from other projects, so I just used that.


I only painted the outside edges. No one will ever see the middle, so why waste the paint?


Ah, so much better. The box stands out more now.

I did tape it to the backer, just because it's an old frame and not quite tight enough.


 And on the back, I also wrote down all the places we moved and when. I also wrote down how old Gabe was when he made the drawing.

Sometimes the best memento is the one you never expected. So, yes, I have a framed box on my wall. And I love it! :) 

This post may be linked at the following parties (for their Blog Buttons see my Link Love page): (M) C.R.A.F.T., Amaze Me Monday, Sumo's Sweet Stuff,  (T) A Little Birdie Told Me  Stories of A to Z, The Blackberry Vine, How To's Day , Type A, Amaze Me August, , Show Me What Ya Got,  (W) Wow Me,  Blue Cricket Design, What I Whipped Up, Wicked Awesome Wednesday, Sweet Peas & Bumblebees (TH) The ArtsyGirl Connection,  Creative Juice, Thrifty 101 , Smilemonsters , Everything But the Kitchen Sink, Shabby Chic Cottage, Thrifty Thursdays, House of Hepworth's,  (F) Fingerprints on the Fridge, Furniture Feature Friday,  Lovely Crafty Weekend , Remodelaholic, For the Kids Fridays, , Craft Goodies, (Sat) Tatertots and Jello , Anything Goes , Funky Junk Interiors (Sun) Creative Blog & Hop, Sundae Scoop, Under the Table and Dreaming

Tuesday, May 29, 2012

Mission: Spy Party

 Gabe turned eight last week, so we had a party. You may know from the past we always invited his whole class, and that is a lot of people. This year we made him chose just a few friends to invite, and that made it easier to have an elaborate mission for them.

But first, invitations. I took manila folders and cut them in half, then I trimmed the open edges to make it folder-like proportions again and just used scissors to cut the tabs that manila folders normally have.
The glue stick is there for scale.

I used the computer to type a little message with party details, inviting the kids to be special agents and come to spy training. I did glue the top of the paper into the mini folder just so it wouldn't get lost, but I added a paper clip because that seemed more office memo-ish.

I printed TOP SECRET from the computer and cut and glued them to the outside. And that was all that was.

When the kids arrived, I snapped a picture of them, a head shot, if you will. These were to go into their passports with their aliases. I made up the passports ahead of time and just had to print the pictures and glue them in while Matt began to train them.

I'll give a tutorial on passports in another post (or this one will be ridiculously long because this one is already ridiculously long). [Update: passport tutorial here.]

Training included code-breaking. They practiced Morse code and learned about invisible ink. We used baking soda-water, which is base on the pH scale, to make messages. Once dry, they used acid either in the form of grape juice or vinegar to reveal the message. We also showed them some other codes they needed to complete the upcoming mission.

We had a "laser" maze made with string and duct tape. Part of training was to practice going through, and this was probably the part that had them most excited. They all loved it.

We also had them do target practice with water guns. This was also exciting, but honestly, go with the laser maze if you have to pick one. It was by far the highlight.

Then they got a message. They were needed for a top secret mission. Former KGB agent Boris Prosorov had stolen nuclear material and was threatening to destroy a city if the UN did not pay him eight billion dollars! Gasp!
[Not that they know what the KGB is, but we went with something "old-school" and not realistic for today's world on purpose.]

We filmed a congratulatory message for the end of the mission. They will run back to back if you watch the video (complete with outtakes.)


Here's how we did the mission:
They had to get to Switzerland, so they grabbed their passports and guns and ran out our side door where Matt loaded them into the "plane" which was just our car with all the seats folded down so it was more like a cargo plane. He got in and put on a "pilot's hat" and rolled them down the driveway (at like 2 mph). Ta-da! They had "flown" to Switzerland. I was waiting to stamp their passports and give them a clue as to where to start.

They ran to the side of the house and read a message telling them they had to shoot down all of the clues from behind the line (it was a mine field that would only deactivate once all the clues had been released).

Attached to each streamer was a letter. All the vowels: A, E, I, O, U, and (sometimes) Y. Each letter was a color of the rainbow. There was also the addition of a Morse code message. The vowels were clues they had to save that would become clear later. The Morse code message led them to the next clue. They had to shoot their water guns at the streamers. We weighted the letters a bit, so that when the streamer got wet, it would break and drop the letter.

The next location was our mailbox. Inside they found a PVC pipe with what looked like a ribbon of gibberish letters. But when they wrapped the the ribbon around the pipe the letters lined up to make a message which read:
Red is a warning.
Green makes up hop.
Snow does nothing.
And tar makes us stop.
This clue told them what the different "bomb" wires did, so to "diffuse" the "bomb" they had to cut the black. (Red made a buzzer, green sped up the clock and white did nothing.)

To get directions on where to go next, they got a call from Headquarters. (I changed my phone so that calls from home said "Headquarters") This sent them to Geneva, and we had a sign on our fence that said Geneva (Clever, huh?). 


At the fence, I quizzed them on their passports, something easy like their alias's last name or birthplace. I told them, "I hear the Russian cafe is delicious."

So they ran to the deck which was set up with a table and chairs. Matt came out of the house with an apron on and presented them with a menu. The menu had an invisible ink message hidden, and so they had to order the grape juice to reveal the message.


The message said, "Time falls like sand. Connect the dots." They could see bocce balls sitting in the sandbox. They were numbered, so they had to use the rope to play connect the dots, and at the point of the arrow, they dug to find a box with a clue and wire cutters. (This was taken directly from Ruff Ruffman, so Gabe knew it as soon as he saw it.)

The clue was missing it's vowels, and those spaces were replaced with colored boxes. They figured out the rainbow colored vowels they received before were the key, so they began to fill in the box. 


It was message from Boris taunting them about understanding the clues about how to diffuse the bomb. 

It's really just a  simple electrical circuit that Matt made look messy.

And there was an address in french. A little jaunt over to the laptop to type it into Google Translator and they knew that they had to go to the Alley beside the Garage.


But, gasp! They still had to get through a laser maze to reach the bomb which was hooked up to the nuclear material (green jello).


So they followed the clues from the pipe code to figure out that they needed to cut the black wire.


It was hilarious how stressed they were watching the lights count down. Clearly they were in to the make-believe. After they successfully diffused the bomb, they got the congratulatory message from the DVD and they "flew" back to headquarters.

Matt had taken away the training supplies and set the table for cake and ice cream during the mission. The cake was a old-school round bomb with a curly candle for the wick.


We also set out Twizzlers since they kind of look like wicks and M&Ms just for fun color. And that was all we did for food. Our party was late afternoon so I figured we were already spoiling their dinners; we did not need to push it. :)


I'll give you a cake tutorial in another post as well, but I can tell you it was sooo simple. [Update: cake tutorial here.]

It was a really fun day. They were thrilled that I sent them home with their water guns and passports. Were we doing this again, we'd simplify it a bit or plan for a three hour party instead of two. We came down to the wire with the timing. 

This post may be linked at the following parties (for their Blog Buttons see my Link Love page): (M) C.R.A.F.T., Amaze Me Monday, Sumo's Sweet Stuff,  (T) A Little Birdie Told Me  Stories of A to Z, The Blackberry Vine, How To's Day , Type A, Amaze Me August, , Show Me What Ya Got,  (W) Wow Me,  Blue Cricket Design, What I Whipped Up, Wicked Awesome Wednesday, Sweet Peas & Bumblebees (TH) The ArtsyGirl Connection,  Creative Juice, Thrifty 101 , Smilemonsters , Everything But the Kitchen Sink, Shabby Chic Cottage, Thrifty Thursdays, House of Hepworth's,  (F) Fingerprints on the Fridge, Furniture Feature Friday,  Lovely Crafty Weekend , Remodelaholic, For the Kids Fridays, , Craft Goodies, (Sat) Tatertots and Jello , Anything Goes , Funky Junk Interiors (Sun) Creative Blog & Hop, Sundae Scoop, Under the Table and Dreaming