Monday, July 16, 2012

Don't Do What I Do

Be inspired by my idea, not my method.

I don't like coffee tables. I love that we can play on the floor with the kids and we are inherently cluttery people, therefore a coffee table would just be messy and in the way.

Instead, I wanted a sofa table, but to make it look right in the living room, it needed to fit with Karl's length (100+ inches) and be only six inches wide. So we were totally in DIY territory.

Oh, the six inch wide thing. That was mostly because it would line the arm of the couch up with the the line of the window frame. A small detail that most people didn't notice, but does make the room feel better when it's lined up.

So, we decided to make it out of a 1 x 8 that was ripped down to 1 x 6 (because lumber doesn't come in that dimension) and just finish the top and outside legs. The center needed legs for support, but it would be sandwiched between the couch and wall and never be seen.

So, here's the general appearance.

I stained and waxed the outside legs.

For the top, I decided to cover it with maps. I love maps. One car trips, when I'm bored, I just pull out the atlas and study maps, sometimes of places we are not even going.

First I used the whole glue/water mixture, and it didn't work at all. It wrinkled the maps and then they peeled off. Strike one.

Bought a new atlas. Realized spray glue would work better. And it did. They stuck with no wrinkles. 

Then, to deal with the excess, I used and X-acto knife and trimmed the maps even with the edge of the board. Strike two.

Seemed fine, but when I sprayed the sealer on, assuming I could seal the edges. But no. The paper again began to peel. Grr.

So, I used a paintbrush and wood glue and reattached the paper, and it held, but sorted of wrinkled a little bit. I sealed again for good measure.

Mateo assembled it all and got it in place.
You can see we did not finish the middle legs or the underside since they would never show.

It works great and the maps are awesome, but they have begun to peel in a few spots. Strike three.

So, if I were starting again. I would have left the excess maps and folded them around the edges and stapled them. But for me it's too late. Seriously, don't do what I did.


However, the six inch wide table is perfect for the space. It's just wide enough to set down a drink, and for a couple of small lamps. And here is what I mean about lining things up with the window.


See how the window panel lines up with arm of the couch? Before things felt slightly off, and now it feels balanced.

Most of the time people will never notice these little details, but they are the ones that make a space feel polished and planned.

Tuesday, July 10, 2012

Art Adventure: Reflections

When I first saw this project demo-ed, the instructor insisted on washable markers. I tried it with my son with regular Crayolas and it worked just fine. Maybe all Crayolas are really washable? But then why are some labeled washable and some are not? Hmm. Deep mysteries.

So, use what you have and see how it goes. Just don't use permanent markers.

Reflections
Supplies:
  • paper
  • markers
  • spray bottle with water

Fold a piece of paper in half.

Draw a picture with markers. Make sure the folded edge is the bottom edge of the picture. It works best to really fill up the paper and have the image go to the bottom edge.

I did trees for an example. But how about a cityscape? Maybe even a person?

Either flip over or unfold and spray the blank half of the paper with water. Set the bottle to a fine mist, but really saturate the paper with water. (Just try to stop the child before you get into paper-falling-apart territory.)

Carefully fold the wet half onto the colored half and rub with hands.

Unfold. And you should have a reflection of the image as if it was at the edge of a pond or even a puddle.


Monday, July 9, 2012

INKJET Transfer Picture

That's right. No need for a laser printer. I found this technique at Red Hen Home and I pinned it...forever ago. So finally I tried it and success! Now, she used a vintage ad and wood and that was awesome, but I decided to try a photograph.

Basics: print onto transparency film, wet surface you want picture to be on, burnish, reveal.

I tested a primed canvas, wood, and fabric. Fabric worked best. A canvas that hadn't been primed probably would have worked, but I did not have one on hand. My wood had too much raised grain, so the smoother the better with that.


So, here's what I did. 
I picked a picture that did not have too many subtle details because the end result is going to be a bit fuzzy. Because I really like the picture, I made sure I duplicated it before messing with it. Every program will let you duplicate.


I opened the copy and then I saturated the color. I also flipped the image since you need a mirror image, otherwise it will be backwards. (If you don't have words, it may not matter though.) I also re-sized the image. When it was ready, I printed the image onto the transparency.

I took my muslin and I stapled it on the canvas by folding the excess to the back and going at with my staple gun. Best tool ever!
 This was after I had already determined that the image did not transfer well to the primed canvas, so I just used it as the base for my fabric. You could wrap your fabric around a board or cardboard too.

I used a water bottle and sprayed the fabric with a fine mist, then used a cloth to blot. I wanted it just barely damp. Too wet and you get a hot mess. Oh, make sure your transparency image is NOWHERE NEAR when you spray or you'll ruin your image. Ask me how I know. Sigh.

Great thing about transperancy is that you can see through it which helps will placing the image.


Grab a spoon and burnish (rub with firm pressure in little circles) the whole image. You can carefully lift up a corner to peek and see if you got it to transfer. When you do, lift off to reveal.


It should look like a well worn photograph.


Now, it depends on what you used and where it's going what comes next. The ink soaks right into the fabric, so if it won't be near water, you can leave it be. If you used a different surface or it will potentially be handled a lot, you need to seal it. Use a polyurethane that is not water-based. If you introduce water back into the mix, you'll just mess up your image.

And guess what? You can just rinse your transparency film off, dry it, and use it again!

So, thanks Red Hen Home. I'm so glad I pinned you. :) 

Linking up to the Pinterest Challenge at Young House Love.
 
This post may be linked at the following parties (for their Blog Buttons see my Link Love page): (M) C.R.A.F.T., Amaze Me Monday, Sumo's Sweet Stuff,  (T) A Little Birdie Told Me  Stories of A to Z, The Blackberry Vine, How To's Day , Type A, Amaze Me August, , Show Me What Ya Got,  (W) Wow Me,  Blue Cricket Design, What I Whipped Up, Wicked Awesome Wednesday, Sweet Peas & Bumblebees (TH) The ArtsyGirl Connection,  Creative Juice, Thrifty 101 , Smilemonsters , Everything But the Kitchen Sink, Shabby Chic Cottage, Thrifty Thursdays, House of Hepworth's,  (F) Fingerprints on the Fridge, Furniture Feature Friday,  Lovely Crafty Weekend , Remodelaholic, For the Kids Fridays, , Craft Goodies, (Sat) Tatertots and Jello , Anything Goes , Funky Junk Interiors (Sun) Creative Blog & Hop, Sundae Scoop, Under the Table and Dreaming

Tuesday, July 3, 2012

Art Adventure: Bleach Splatter Shirts

I'm the master of procrastination when it comes to Independence Day. I always decide to do it up the day before.

So, this year I figured the kids could make their own holiday shirts. The bleach splatter shirts are making the rounds. I actually accidentally did this to a shirt this past winter -- long story -- and after seeing the internets explode with them, I thought this could work with kids. In a controlled environment, of course. But seeing the bleach slowly change the color is kind of magical.

Bleach Splatter Shirts
Supplies:
  • blank shirts, not white (darker colors work best)
  • cardstock
  • bleach
  • water
  • spray bottle

First, you need a shape (or shapes). We wanted stars for the whole stars and stripes fourth of July thing. I made stars on the computer and printed on cardstock, just so we had nice shapes, but you could draw them on the cardstock. Either way, the shapes need to be cut out.

Stuff some cardboard inside the shirt and lay out some place flat that won't get damaged.

Adults, fill the spray bottle. I used a little bottle and put a capful of bleach and topped it off with water.

Have the kids position the shape(s) where they like it. Let them choose. It's their shirt. 
They changed their minds right after this pic, but I didn't snap another picture.

Once they are happy with it, have them spray. Make sure the bottle is on mist. Light is best, but they may go a little nuts. It's fine. Don't stress.

When done, lift off the shapes for the big reveal. Then immediately have kids wash hands. 

While they do that, remove the cardboard and wash the shirts. I wash bleach shirts in the washer with no other items. I realize it's a bit wasteful, but you need to remove the excess bleach and you don't want to risk other clothing.

Once dry, they can wear their creation with pride.

Other options:
1. Instead of bleach, use white shirts and fill spray bottles with fabric dye and spray.
2. Add some finishing details with fabric paint pens.

Monday, July 2, 2012

Karl's Sexy and He Knows It

Does anyone remember our crazy experience bringing Karl home from Ikea? I can't forget. Moral of the story was, use a truck (or spring for delivery)!

Anyways. We love Karl. Is he a forever couch? No. I know he's not the kind of quality that you just know you will enjoy for years on end, but with little boys in the house, Karl is perfect for us.

When we first got the couch, many people offered comments on the blog about how they hate the cushions, etc. Yes, so very helpful after he's already been purchased and set up in the house. :/ 
But, in response I have offered this tip for all couches:
we all have our favorite places to sit, so those cushions get more worn and squashed. To keep things evened out, flip and rotate all the cushions. The sectional has different sizes for different spaces, but I take the back cushions and flip them about once a week, and then I also switch which spot the cushion is in at least once a month. It really makes a difference, especially with loose back cushions.
The blonde legs look so small and eh.

I did have one eensy little complaint about Karl though. His legs. I don't love blonde wood and on Karl, I felt they cheapened him. Out on the blogs I've seen several painting of the legs, including on Young House Love, which was my main inspiration. BUT, I didn't want paint.

So, we dismantled Karl and took off his legs.

Sanded them. Sand until you think you have done enough and then go back and do it again. That Ikea sealent is quality stuff, man! Hard to get off. In fact, my legs stained unevenly because I didn't get it all off, but I love it anyway.

I used Minwax stain in Jacobean. I just used an old tee shirt and rubbed it on, let it sit for about five minutes, then wiped it off. I think the can recommends fifteen minutes, but seriously, who is that patient? Not this girl.

It was uneven and I wasn't sure, but then I decided I kind of loved the organic, uneveness of it paired with the modern, clean lines of the couch.

After they dried, I sealed them with Shellac spray and let dry. Then I Matt reassembled Karl.
Totally need to rotate those cushions! I had just kicked the kids off so I could snap a picture. :)

LOVE.

I'm so glad we finally made this easy change. Now I just need to find some new pillows...

This post may be linked at the following parties (for their Blog Buttons see my Link Love page): (M) C.R.A.F.T., Amaze Me Monday, Sumo's Sweet Stuff,  (T) A Little Birdie Told Me  Stories of A to Z, The Blackberry Vine, How To's Day , Type A, Amaze Me August, , Show Me What Ya Got,  (W) Wow Me,  Blue Cricket Design, What I Whipped Up, Wicked Awesome Wednesday, Sweet Peas & Bumblebees (TH) The ArtsyGirl Connection,  Creative Juice, Thrifty 101 , Smilemonsters , Everything But the Kitchen Sink, Shabby Chic Cottage, Thrifty Thursdays, House of Hepworth's,  (F) Fingerprints on the Fridge, Furniture Feature Friday,  Lovely Crafty Weekend , Remodelaholic, For the Kids Fridays, , Craft Goodies, (Sat) Tatertots and Jello , Anything Goes , Funky Junk Interiors (Sun) Creative Blog & Hop, Sundae Scoop, Under the Table and Dreaming

Wednesday, June 20, 2012

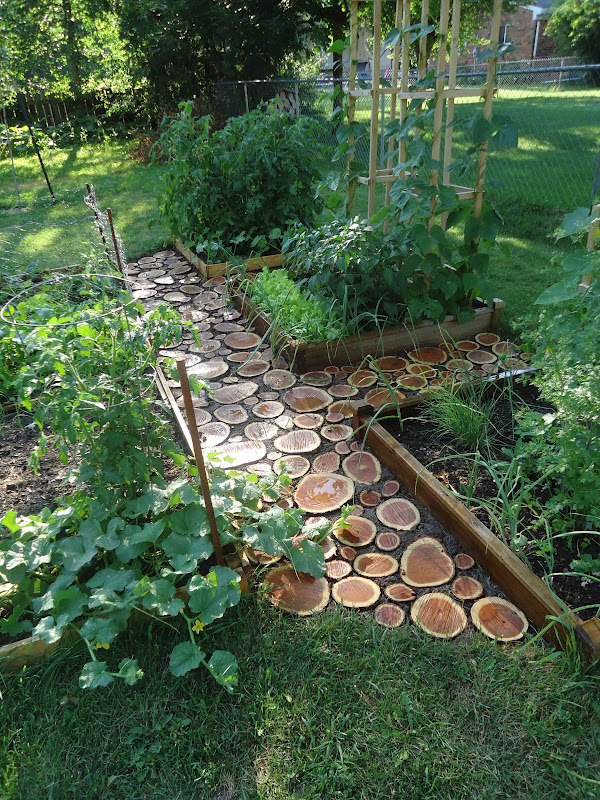
Garden Path Redux

[UPDATE: click here for the final garden path update.]
 
Sooo. Y'all seem to love the Garden Path. 


All time most viewed, and most featured. (Even contacted about a magazine feature, but alas, I live in the wrong region.)

Also, the source of a thousand and one questions. So, here it is: the complete, honest update.

I knew the wood would weather. Usually weathered wood is pretty. But before spring had completely sprung, I knew I was no longer in love with my path.

So sad.

A LOT of people asked about using polyurathane so that the disks would not rot. Well, they did not rot. If this was a more shaded and protected area, they might have even weathered nicely. But there were absolutely no rotting issues. There was just an ugly issue.

I decided to fix it, we would cut new disks and coat them, but I wanted something that was environmentally sound. The EPA recommended Shellac, and being natural, it seemed like a good idea. I've shellacked things before, so I knew the product.

I just brushed one side, waited an hour, flipped it over and painted that side. Time consuming, but easy.

I only did one coat, so I guess time will tell as to any regrets on that choice.

We also made these a bit thicker. The last ones were about 1-3 inches. I had talked last time about how they sometimes pop up when you walk on them, and some of the disks broke during the year, so we figured thicker might help. These new ones average 4-5 inches.


One major headache the first time was our darn hard clay. It was hard to scratch out the space to set the disks and then pack them in. I loved the rich dark soil color against the wood, but it did not hold them as it should. Many people wondered about using sand.

So we tried it. First we tilled the soil to make it as loose as possible and then we added a bit of sand and worked that in.

It was much easier to get the disks set in this time. I still don't love the color of the sand, but we planted ground cover, so hopefully that won't be much noticed soon.


Of course, last time the ground cover didn't grow in, so who knows? Maybe I'll just have to grow to love sand.

Another question I was asked A LOT was whether or not the wood was slippery when wet. Um, no. It's not like the disks are a smooth surface of wood. They are broken up with gaps in between and also not sanded or anything. They are smooth enough to walk barefoot on them, but no, they have never been slippery. Of course, the entire set up does not induce one to walk quickly in the first place. And, no, they are not slippery now that they have been sealed either.

I loved how the first path looked, so when I went and checked it last spring I was heartbroken at how it appeared. I was determined to fix it, and so we did. I am in love with it once again. I am pleased to say that the disks are not popping up at all. They are very solidly set in the sand, even after a pretty decent rain.

And, as always, I'll keep you posted about how this version weathers.

And, hey, firewood for the fire pit, so that's not so bad.

This post may be linked at the following parties (for their Blog Buttons see my Link Love page): (M) C.R.A.F.T., Amaze Me Monday, Sumo's Sweet Stuff,  (T) A Little Birdie Told Me  Stories of A to Z, The Blackberry Vine, How To's Day , Type A, Amaze Me August, , Show Me What Ya Got,  (W) Wow Me,  Blue Cricket Design, What I Whipped Up, Wicked Awesome Wednesday, Sweet Peas & Bumblebees (TH) The ArtsyGirl Connection,  Creative Juice, Thrifty 101 , Smilemonsters , Everything But the Kitchen Sink, Shabby Chic Cottage, Thrifty Thursdays, House of Hepworth's,  (F) Fingerprints on the Fridge, Furniture Feature Friday,  Lovely Crafty Weekend , Remodelaholic, For the Kids Fridays, , Craft Goodies, (Sat) Tatertots and Jello , Anything Goes , Funky Junk Interiors (Sun) Creative Blog & Hop, Sundae Scoop, Under the Table and Dreaming